API Usage example: Estimating Workflow Completion Dates
Pneumatic’s API makes it possible to create automations and get data from Pneumatic programmatically. Pneumatic makes all the data stored in the system available through the API. Among other things, it means you can use that data to create any type of analytical report to look back at past performance or to make forecasts about anticipated future performance.
Use Case
Let’s assume we want to:
Extract data about our workflow runs from the Pneumatic Public API;
Store resulting data in the Google Sheet;
And the massage exported data to get a nice looking custom report.
Pneumatic allows you to enter a ‘due in’ value for every task in a workflow template. Theoretically, if we enter due-ins for all the steps we can then estimate completion dates for all workflow instances.
Suppose our company uses a simple script creation process consisting of:
Analyze requirements
Create a script (a simple piece of software)
and then release it
We can enter due-ins for all of the steps in our process and now that we’ve got our script creation Workflow Template we can run multiple Workflow instances from it:
How might we go about finding out when each of these workflows will be completed?
API to the Rescue
Let’s create a Google Sheets spreadsheet where we’re going to enter the data we need to access Pneumatic’s API and collect data we get from it — Completion Dates Estimation Example.
Let’s keep it simple, we need somewhere to put our API Key, which we get from our integrations page:
Then we’re also going to need the ID of our template, which we can get from our template’s URL:
And as for the names of our columns let’s just enter them manually as a guide for what information we want to be getting from Pneumatic:
Now we need to go into Extensions —> AppScript to create the codes that will access Pneumatic’s API and get from there the data that we want:
Permissions
If you try running either script in the spreadsheet, Google is going to ask you for permission to run them, give the permission by clicking on Allow.
How to Mass-Start Workflows
If you want to learn how to start multiple workflows from a Google spreadsheet, we have an article about that.
Pneumatic has detailed API documentation which you can find here, but in this guide we’re going to keep it simple, well, relatively simple. The spreadsheet shared at the start of this document already has all the functions you need to get your completion date estimates ready to go (for our example).
In the panel at the top you can select which function will be executed if you click on Run.
The function we need is getCompletionDateEstimates:
function getCompletionDateEstimates() {

  let end_point = 'https://api.pneumatic.app/workflows';
  const sheet = SpreadsheetApp.getActiveSheet();
  const apiKey = sheet.getRange(1,2).getValue();
  const templateId = sheet.getRange(2,2).getValue();
  end_point = end_point +'?template_id='+templateId;

  let config = {
    muteHttpExceptions:true,
    method: "get",
    headers: {
      'Authorization': `Bearer ${apiKey}`
    }
  }

  const templateData = getTemplateById(apiKey, templateId)

  const response = UrlFetchApp.fetch(end_point, config);
  const json = response.getContentText();
  const workflowData = JSON.parse(json);
  const workflows = workflowData.results;
  const today = new Date();
  //console.log(workflows)
  let row = 5; //the row where we start writing data
  for (let workflow of workflows) {
      sheet.getRange(row,1).setValue(workflow.name);
      sheet.getRange(row, 2).setValue(workflow.task.name);
      sheet.getRange(row, 3).setValue("Task "+workflow.current_task+" out of " +workflow.tasks_count);
      //console.log(workflow.task);
      sheet.getRange(row, 4).setValue(addDays(today, daysLeft(workflow.current_task, templateData.tasks, workflow.task)));
      row +=1;
  }
}
This function is fairly straightforward:
First gets hold of the Pneumatic API access inputs we entered into the spreadsheet earlier (the API Key and the Template ID).
Then it creates the Pneumatic endpoint we need to get hold of our workflows.
It creates a config object to put the api key into and then fetches the workflow information by executing the fetch method on the UrlFetchApp object.
Finally, it iterates over the workflows and fills the cells in our table with the information we want.
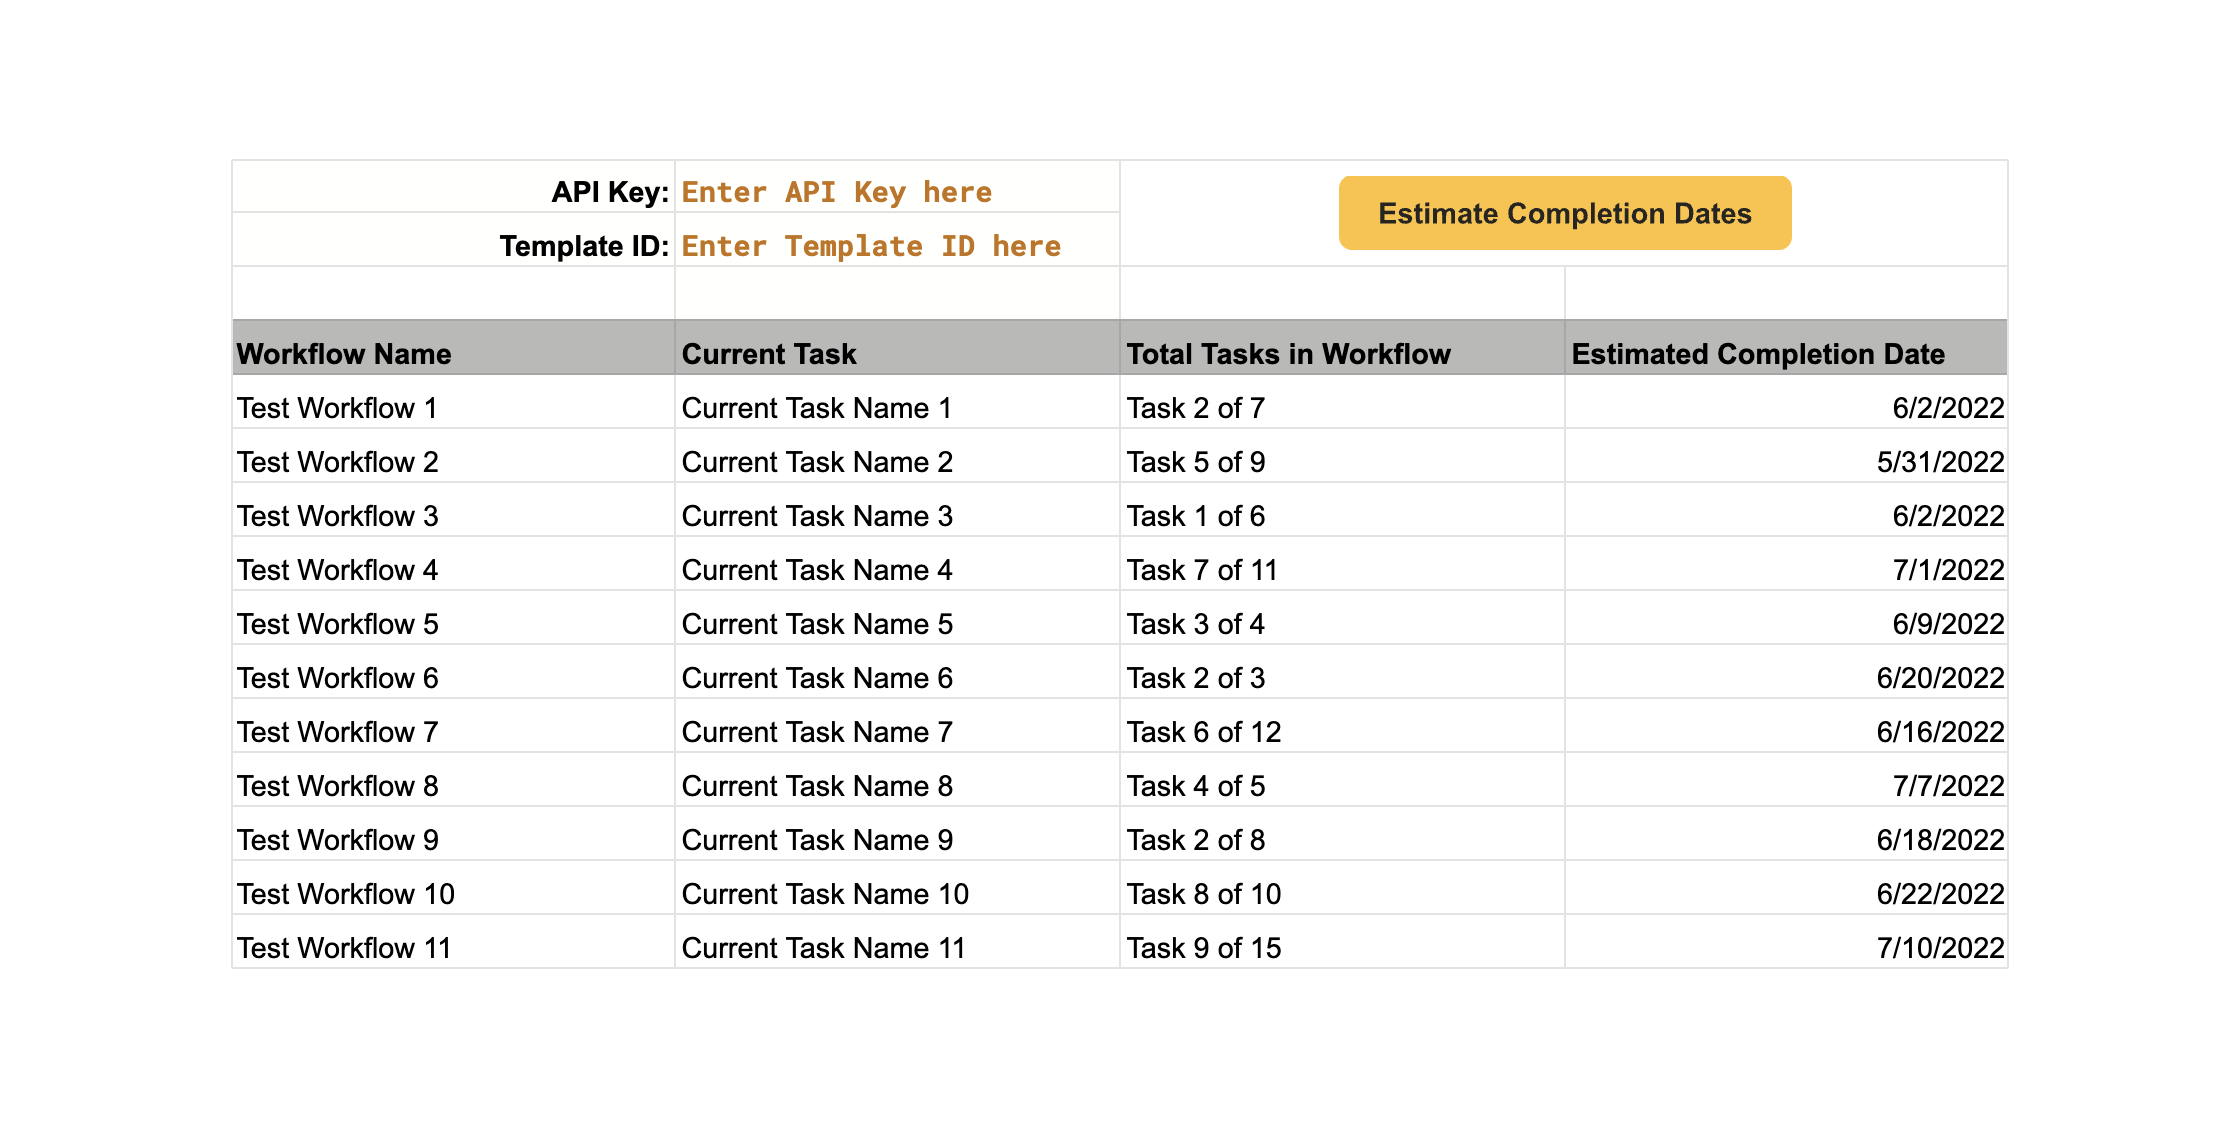
If you click Run and then go back into the spreadsheet you will find that it’s been filled in with data:
There is some hidden complexity going on there. You can see that our function makes use of some other functions.
It gets hold of our Workflow template data because we need that information to get access to the due-ins we entered in the template:
It uses a different endpoint to get the template we want and just returns the template data. Then inside the loop we call two more functions, addDays and daysLeftaddDays() just adds days to a date to get another date:
    function addDays(date, days) {
      let ret = new Date(date);
      ret.setDate(ret.getDate() + days);
      return ret;
    }
Meanwhile, daysLeft is the function that does the heavy lifting of our estimating and makes all sorts of assumptions:
function daysLeft(currentTask, tasks, taskInWorkflow) {

    let ret = 0;
    ret += extraDays(currentTask, tasks, taskInWorkflow);//add extra days for tasks that have not been completed yet
    // no extra days get added for overdue tasks;

    for (let i = currentTask; i < tasks.length; i++){
      let task = tasks[i];
      if (task.due_in !== null) {
        let splitDueIn = task.due_in.split(" ");
        let splitTime = [];
        if (splitDueIn.length > 1) {
          ret += parseInt(splitDueIn[0]);
          splitTime = splitDueIn[1].split(":");
        }else {
          splitTime = splitDueIn[0].split(":");
        }
        if (parseInt(splitTime[0])>12) {
          ret +=1; //add an extra day if there's more than 12 hours in the due in
        }

      }else{
        ret += 1; //assume that if there is no due in the task takes 1 day
      }
      return ret;
    }
}
First it calls the extraDays function which basically looks at whether or not the current task is overdue and if it is it returns zero. If it isn’t overdue it returns the difference between the estimated due date and now:
function extraDays(currentTask, tasks, taskInWorkflow){
  //const dateStarted = new Date(taskInWorkflow.date_started);
  const estimatedEndDate = new  Date(taskInWorkflow.estimated_end_date);
  const now = new Date();
  if (estimatedEndDate < now) {
    //console.log(Math.round((now - estimatedEndDate)/(1000 * 60 * 60 * 24)));
    return 0;
  }else {
    extra = Math.round((estimatedEndDate - now)/(1000 * 60 * 60 * 24));
    //estimating the difference in days by rounding days to integers
    console.log(extra);
    return extra;
  }
}
Internally JS represents days as the number of milliseconds from the time the first unix machine went online or some such thing, thus the (1000 x 60 x 60 x 24) malarky to convert milliseconds into days.
Here we’ve got our first big choice about how we go about estimating dates: we’re just rounding days off here so that 1.5 days = 2 days and 1.3 days = 1 day.
Now back to daysLeft():
   for (let i = currentTask; i < tasks.length; i++){
     let task = tasks[i];
     if (task.due_in !== null) {
       let splitDueIn = task.due_in.split(" ");
       let splitTime = [];
       if (splitDueIn.length > 1) {
         ret += parseInt(splitDueIn[0]);
         splitTime = splitDueIn[1].split(":");
       }else {
         splitTime = splitDueIn[0].split(":");
       }
       if (parseInt(splitTime[0])>12) {
         ret +=1; //add an extra day if there's more than 12 hours in the due in
       }

     }else{
       ret += 1; //assume that if there is no due in the task takes 1 day
     }
     return ret;
   }
Here we loop over the remaining tasks and check whether a task has a due-in parameter filled in, if it doesn’t we just go ahead and assume that the task will take exactly one day to complete, however if it does, we need to deconstruct the due-in parameter.
We check if the task is due in 1 day or more and we add the number of days to our return value. And then we look at how many hours the task is due in and if it’s more than 12 hours we add another day to our return value. Here we’re choosing to be a bit conservative with our estimation.
All those splits have to do with how Pneumatic stores due-ins internally — they’re stored as strings, so we need to break them down into values that we can parse into integers, thus all the string manipulation hoops that we need to jump through.
How to Export Workflow Data
We also have an article on how to get data from specific output and kickoff form fields into a Google spreadsheet.
Now, all this code may look a tad intimidating, but it really isn’t that big of a deal and the best thing about it is that once it’s been written it can be reused ad infinitum.
Regardless of how many more workflows you run, you can get info about them into this spreadsheet and see when each one of them should be completed, give or take a day (or two).
So essentially what Pneumatic’s Public API allows you to do is achieve Automation Nirvana, where the information you need is just a mouse click away in exactly the format you want to see it in.
Share with the World
API Usage example: Estimating Workflow Completion Dates


 10-minute read